
I have been lucky to travel the world Geocaching along the way.
The problem was maps were a big problem. I remember going to Europe in 2009 and buying Garmin maps that took forever to draw/move.
Then there were free maps by Ibycus but they were NOT routable. That means they would not tell you how to get from point a to b.
Then Open Street maps (OSM) came along with a version for Garmin GPS that were routable.
Since then I have not looked back.
They are FREE and pretty much cover the globe. I have used them in China, India, Vietnam, Japan to name a few places and they have been good.
The best parts of these maps they are updated every 2-3 weeks and they are FREE.
Maps you buy from Garmin are on average using data that can be as much as as 12 months out when the map is published.
I am amazed that many out there that use several models of Garmin GPS still don’t know that their GPS can be loaded with FREE maps. Look at you specs of your GPS and see if has the ability to add maps, if it says yes then this should work for you. The site is called Free worldwide routable Garmin maps.
I know the Garmin 62 series, Gamin 64 series, Oregon 300, Oregon 450, 550, 600, 650, 700, 750, Garmin 78 series, Montana series, eTrex 20, 30 accept these maps.
Now a word of caution the early Oregon have a size limit to the microSD Cards of 4 GB while other have upwards of 16 GB limit.
I have the 62S and 64S and have found these maps to be very good and the best part they are routable. What this means is you can get turn by turn directions from point A to B or the geocache. These maps are updated on a regular bases and they allow users such as yourself to upload tracks to place in the may of new roads or trails.
Something new that has been added since my last post on this is you get a choice of the type of map you can select such as Generic Routable (new style) which shows more detail such as tunnels.
So once you open the page you have to select the type of map. I recommend Generic Routable (new style) now.

You then have to select the map for a particular area such as a Province/State or Country, in this example I have used British Columbia (BC), if that is all you need. If not skip down to Custom Maps
![]() Now once you have selected BC you can now download by going to the link in the screen shot below.
Now once you have selected BC you can now download by going to the link in the screen shot below. Click the download map now!link and you will see this:

Click on the photo above or any photo in this blog to see a larger clearer version.
You want to select the bottom link osm generic new gmapsupp.zip
Once you download this zip file you have to unzip the file. This is done by double clicking on the folder and once it opens you should see a file called gmapsupp which should be a disc image file.
Save it to your desktop and then right click on it and change the name to this gmapsupp.bc as this is a map for BC. If it is a Country then change it to gmapsupp.countryname.
The reason you need to add/change the name is because if you add another map named gmapsupp it will overwrite the map already there.
Once this is done you can place it on your microSD card. I suggest either connecting your GPS to your computer and locating your memory card if you have one or taking a new microSD card and using the adapter and insert it into your computer, the later is much quicker.
If your microSD card is new you have to add a folder called Garmin. If not and it was used for something else you have to format the card then add the Garmin Folder.
Once this is done open the Garmin folder and drag gmapsupp.bc or other such file into this folder or send it to it.
Once this is done the above remove the microSD card from the adapter and insert the microSD card into your GPS.
Now turn on your GPS and go to map set-up and see if the map turns up in the menu. It will show up either of one of two ways Enabled – OSM World Routable or the name you just gave it or Disabled, if it is disabled then enable it.
Now go to the map and the area you downloaded and make sure it is there.
I will now explain how you to make a custom map.
You can not download a separate OSM Map say for BC and Washington and place them on the same microsSD card as along borders you will end up with a thatched area.
The reason for this is that each map set shares the same tile for each map set along a border. The GPS does not know how to read two tiles at the same time so the area shows up thatched.
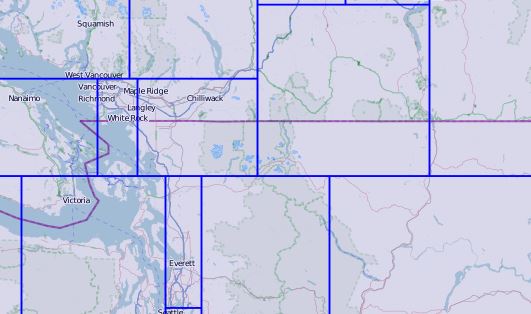
As you can see how the tiles overlap the Canada/USA border.
To get around this we can make a Custom Map and select the tiles we want for the places we are going.
For instance last year I did a cruise from Singapore, Malaysia, India, Dubai, Greece, Malta to Barcelona Spain through the Suez Canal. I selected the tiles for the whole trip and made one map and placed it onto my GPS. It worked great and got me around in these places.
So we once again start by selecting our Map Type.We then move down the page and we see this box.

Put a tick in the top box marked in yellow then enter your email address below
We then move the map to the area we want to make a map for and zoom into that area. I say this because in some places there are some very small tiles and then can be missed if you don’t. I can tell you from experience that I did this in the early days and get to a place and no map. I also suggest selecting an additional tile if you are going near the edge of a map. I have near the edge and realized I need to go farther to get turned around and once again no map.
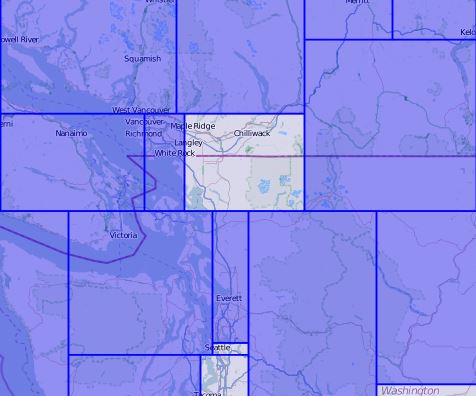
Click on each tile you want to select to make your custom map.
Click on each tile you want and the tile will turn blue this is the area you have selected and want for your map.You can see there are 2 tiles I have not select but would have continued to select them for my map but wanted to show you the difference.
Once you have finished selecting the map you want then zoom out and see if it what you want.
If it is what you want then scroll up the page and where you entered your email address you will see a button Build my Map. Click it once!
You will then be taken to a screen that tells you how many are ahead of you. You will also get an email with a tracking link that you can check the status of your map.
Once the map has been completed you will get a second email with a link you click to take you to the download.

In most cases you only have to concern yourself with 2 choices above.
You want to select the link osm generic new gmapsupp.zip for your GPS and download it.
This is important that you note how long your link is good for. You can usually only download from the link supplied for 60 to 72 hours. If you miss this window then you have to start all over.
I am going to touch on something briefly and that is there is a link ending in windows exe. Reading to the right of it you can notice that the map you made can ne installed on Garmin Base Camp/Map Source. Just remember that it is installed as a generic name and will be over written each time unless you change the name.
Once you have downloaded the map you then follow the same instructions at the top of the page to install it.
I am going to give you a link to a program called JaVawa device Manager
This program can do many things such as change map names on your GPS and change map names for Base Camp and Map Source. It can update you GPS to the latest firmware.
I also recommend that you don’t do this just before a planned trip.
The help file for this program will take you though what it can do.
I hope this helps and drop me a comment if you have a problem.